I use an external 4TB HDD to backup all my macs via Time Machine. I first hooked it up to a Raspberry Pi, but the Linux drivers were not very reliable. Instead, I connected it to my iMac and shared it via SMB/AFP (AFP is no longer available on Big Sur) with a specific user named timemachine over the network.
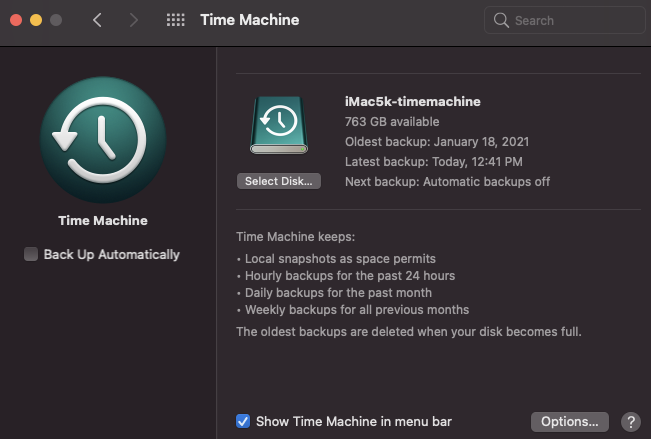
All other macs connected to this share once, and they automatically backup via the iMac on that disk every day. The setup used to work pretty smoothly until I upgraded to Big Sur on a new Samsung T5 SSD. The problem is that my new drive is APFS case-sensitive, but the backup disk is formatted as HFS+ case-insensitive. As such, time machine refuses to backup due to possible filename conflicts.
I spent some time and discovered some good stuff, that I will share here with you. First of all, know that SharedTimeMachine is the folder created when you share a drive as time machine backup. But the interesting stuff is inside, for each of the devices that you backup, a file named Hostname.sparsebundle is created where hostname is the hostname of that device.
If you attempt to open these sparsebundle files (directories), your system might freeze. The reason is that these are Apple specific sparse file disks that store the data in several ~8MB files. That means for a 8 GB backup, you will have 1000 files, and for 800 GB of backup, you will have 100,000 files! Now try listing a 800,000 file directory over the network :)
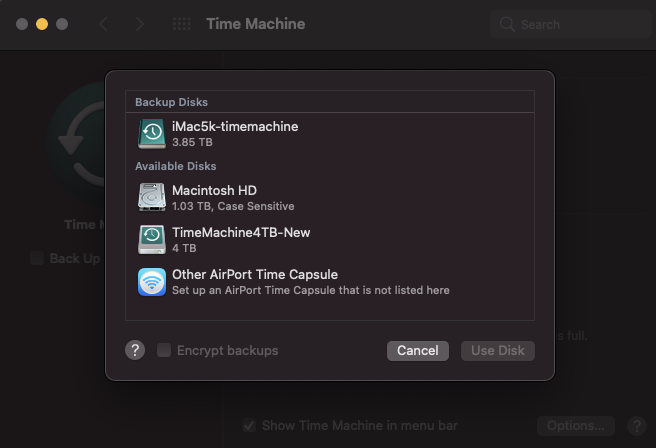
The solution to backup my case-sensitive filesystem on a case-insensitive separate drive was ironically very simple: create another sparsebundle, this time APFS and case-sensitive, and backup my main iMac on that!
I did that, and it worked pretty well. The only caveat is that you have to mount this drive before timemachine can use it. That can be done either using a cronjob, or using startup items (adding the file to your startup list). I used cronjob because my cats unplug the device from time to time and I don’t want time machine to stop because of that until my next reboot (which is once every few months).
The other downside is that when you are attempting to restore from a backup, you need to mount the sparsebundle first. This is straightforward as recovery also supports Disk Utility.
Now to have more reliable sparsebundles that don’t crash and die on you frequently, you should reduce the number of files and increase the individual file size. Instead of 8 MB per file (resulting in hundreds of thousands of files in each bundle), you should go for 128MB to 512MB per file, resulting in about 1,000 to 10,000 files per bundle. Still, each 128MB file can be downloaded over network in a reasonable time, and it can easily be recovered if damaged.
The following command can be used to create a sparsebundle with case-sensitive HFS+ and with 128MB band files:
$hdiutil create -library SPUD -fs 'Case-sensitive Journaled HFS+' -type SPARSEBUNDLE -imagekey sparse-band-size=262144 -tgtimagekey sparse-band-size=262144 -layout GPTSPUD -nospotlight -size 3.5t -volname VOLUMENAME file.sparsebundle
Size is 262144 because each block is 512 bytes (262144×512 = 134,217,728, i.e., 128 MB). Note that size 3.5t defines the maximum size of the bundle. I set it to 3.5 TB because I wanna leave 500 GB for other backups at all times. Feel free to change file and VOLUMENAME to your heart’s intent.
Put the resulting file (should be about 200MB) on your backup disk and voila! You just need to mount it as explained above.
Additionally time machine might refuse to accept it as a destination the first time you mount it. Don’t fret, simply use this command, and it will accept it henceforth:
$sudo tmutil setdestination /Volumes/VOLUMENAME
3 comments On Time Machine a Case-sensitive Disk on Case-Insensitive Drive Big Sur
Why choose HFS+ instead of AFPS (Case-Sensitive)?
The backup disk was already used by many other macs and has years worth of backup in it. I cannot reformat it!
How do I remove old TM destination disks no longer needed.